Wednesday, September 22, 2010

Shortcut to Learning Guitar Chords Part-10

CONCEPT 11: SUSTAINED or SUS CHORDS

To get sus chords, move the lowest finger UP 1-step.

Asus derivation:
Asus final:


Esus derivation:

E sus final:


For the same reason that you cannot use M7 and 7 at the same time, you also cannot use minor(m) and sus at the same time.

Now, Try this: Bbm7, EbM7, G#M7, Gsus, G#M7sus


This is the end of my tutorial. If at this moment you are still confused, go back and follow each part slowly. Even if you need to read all over again for the 3rd or 4th time, do it. It will be all worthwhile than memorizing the chords individually.

You should be able to derive at least a hundred chords once you understand all concepts. Enough chords for a weekend jam! Cheers!

Shortcut to Learning Guitar Chords Part-9

CONCEPT 10: MAJOR 7th CHORDS

To get Major 7th or M7 Chord, move the Middle Finger down 1-step.

Let's dive in quickly. Deriving AM7 from A:

Final AM7 :

Take a look at he A-chord again...

AM7 looks like this (note: the fingers are rearranged like in Am) :


Deriving EM7 from E...
EM7 is:


In actual: E-chord (you should know it now!) and EM7 are:

E:

EM7:


Note that M7 and 7 cannot be combined because they use the same finger movement just that the extent of movements are different.

To recap: M7 and 7 use middle finger. M7 move middle finger down 1-step. 7 move middle finger down 2-steps.

Try these: A#M7, GM7

Shortcut to Learning Guitar Chords Part-8

CONCEPT 9: 7th CHORDS

I don't expect you to have many writings on your wall, but you could (or should?) write and remember this again:

To get a 7th Chord, move the Middle Finger down 2-steps .

Let's try A7, we will derive from A-chord, of course.


The finger hit the nut? Leave it an open string! A7 is:

Add Image
If this is A (it really is),

then A7 is:


E7 should be simple. Starting from E:


Final E7:


In pictures, E-chord and E7 respectively:


At this point, pause and ponder. How many chords you can derive now? See how many of the listed chords you can figure out. HINT: Proceed one step at a time. Say A#m7: start from A, derive A#; from the A# position: derive minor(m) to get A#m; from A#m position: derive 7th to get A#m7.

A,Am,A7,Am7
B,Bm,B7,Bm7
C,Cm,C7,Cm7
D,Dm,D7,Dm7
E,Em,E7,Em7
F,Fm,F7,Fm7
G,Gm,G7,Gm7


A#,A#m,A#7,A#m7 / Bb,Bbm,Bb7,Bbm7

C#,C#m,C#7,C#m7 / Db,Dbm,Db7,Dbm7

D#,D#m,D#7,D#m7 / Eb,Ebm,Eb7,Ebm7

F#,F#m,F#7,F#m7 / Gb,Gbm,Gb7,Gbm7
G#,G#m,G#7,G#m7 / Ab,Abm,Ab7,Abm7

Shortcut to Learning Guitar Chords Part-7

CONCEPT 8: MINOR CHORDS

Sorry, but we need to agree again to a new terminology I am going to use in all the rest of the tutorial. My aim is to make your learning a lot faster, no technical jargon.

In previous posts, I have been talking about moving the whole chord position up or down. Meaning, all finger positions move up, or down, simultaneously, same step-count.

This time, we need to move some fingers up or down without moving the chord's position in the fretboard. We will use this method for minor (m), seventh (7), major seventh (M7) and sus derivations.

New term: middle finger, lowest finger. These are the literal finger position in the fretboard as you fret a chord, excluding the barre finger. Lowest finger, is the finger closest to the ground, middle finger is the next finger closer to the ground.

Let's look at A-chord again.

Clear? Now write this on your wall:

To get a minor, move the lowest finger down 1-step.

Deriving A-minor ,or simply Am, from A:

Finally, Am is:

I figure some pictures will illustrate clearer. The A-chord is:


And Am, note how the fingers are rearranged.


Let's try Em...from E of course!
If a note hits the nut, you don't have to press anything-- leave it as open string. So Em is:


Let's do it... E-chord:


Em. Yes, lift the index finger and that's it! Easy?

You should be smiling now. Try these: Bm, Gm, Fm

Review Part-6, and try these: A#m, C#m, Abm

Now you could derive 12x4 or 48 chords! Believe me, once you get used to the derivations, it's a lot easier and intuitive than memorizing all 48 chords individually.

Shortcut to Learning Guitar Chords Part-6

CONCEPT 7: Sharps and Flats

The Sharp and Flat Chords are the chords that are positioned in between the 2-steps you move up or down the fretboard in deriving chords.

Sharp is symbolized as #, and Flat is symbolized as b. Sharp means 1-step higher, and Flat means 1-step lower. In formal guitar terminology, Sharp means 1-semitone higher, and Flat means 1-semitone lower ( higher & lower refers to pitch). Ooops, no technical jargons. Ok, in my tutorial, we only use "step", which also means "1-fret". So:

SHARP = # = 1-step UP

FLAT = b = 1-step DOWN


To illustrate clearer, let's take A-to-B derivation. Let me remind that B is 2 steps up from A. See Part-5 if you're getting lost. If you move A 1-step up, you'll have A#. Technically, A# is the same as Bb. Now study the diagram below.


Look at these three chords shown. The first one is B-chord...


Moving 1-step down, we'll get Bb (or B-flat)...


and, moving 1-step up, we'll get B# (or B-sharp); or C-chord as you'll find out after you read some more below.


You should be able to name the chords now in each step up or down your fretboard. If we use an A-chord to derive other chords and we move 1-step at a time up the fretboard, we'd have:

A-A#/Bb-B-C-C#/Db-D#/Eb-E-F-F#/Gb-G-G#/Ab-A

Note the following:
A# = Bb
C# = Db
D# = Eb
G# = Ab

Also, using the E-chord and moving 1-step at a time up the fretboard, we'd have:

E-F-F#/Gb-G-G#/Ab-A-A#/Bb-B-C-C#/Db-D#/Eb-E

Note that there's no B# or E#, because these are C and F respectively. Likewise, there's no Cb and Fb.

And if you have noticed, you can derive 12 chords by now!

Sunday, September 19, 2010

Shortcut to Learning Guitar Chords Part-5

CONCEPT 6

A chord "tone" includes the effect of the "free strings". The free strings are also called the "open strings", and it means the "unpressed" strings -- the strings not pressed by any finger.

In previous post, we talked about "move up" or "move down". Remember this: if you move up, move up everything, and if you move down, move down everything.

To make this point clearer, take a look again at A-chord. As you can see, only 3 strings are marked to be fingered.

The A-chord:

But the "complete" A-chord is:

By now, You should have figured out how to press the 3 original note on the fretboard. Except the 2 "new" notes on the right, did you noticed them? Don't worry, you don't really need to press them. You cannot press at or before the nut. The notes are shown to mean "they are included in the A-chord". These are "open strings". The "X" means you should not use the string.

(I am changing my position about including the fat-E string in A because it may be helpful to not give it so much attention at the beginning, it will have a "not so nice" repercussion in a little bit advanced chords like A/E, B/F etc. I will show derivation of these chords in a separate post.)

Let's try an example. Let's get a B from A. Remember that if I move A 2 steps up, I'll get a B?

First, start with complete A. Yes, use the "complete A" I have drawn. Moving 2 steps up (new notes in yellow, 1-arrow means 1-step or 1-fret of movement) :

Done? No, not yet. Notice the 2 notes on the right? They should move as well -- move up everything! So the whole derivation should be like:

Wait. Including the Xed string? You can ignore it for now. But probably you'll end up pressing it anyway, you'll see. Just don't use it just the same. The resulting notes from moving A's notes 2-steps up, which is B-chord, is therefore:

If you've been paying real attention, I bet you're now bewildered how the hell you're going to fret 5 notes when you only have 4 fretting fingers...yes, only 4 fretting fingers as the thumb may not be usable. Some actually use the thumb to fret on the uppermost string, but as you see, the string is X'ed. Useless.

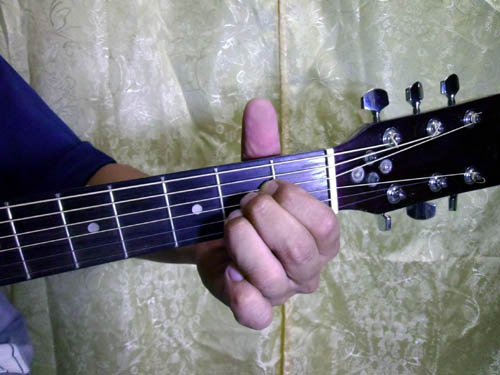
Here's how: use your index finger to cross the fretboard and press the 2 rightmost notes simultaneously, like:
You are supposed to have enough fingers to fret B-chord now. You may have noticed now why I included the X'ed string-- as you "bar" across the fretboard with your index finger, chances are you're pressing the fat-E also. Remember: don't use it.

These kind of chords, re: chords requiring your index finger to cross the fretboard and simultaneously press notes, are called "barre chords". The beauty of barre chords is that just by moving up or down the fretboard, you'll figure out other chords.

Back to B-chord, you may see chord charts symbolizing the "crossing finger" as a simple line or arc across the fretboard, like:


That was it. If you move up, move all notes up. If you move down, move all notes down.

Finally, shown here is how to do the B-chord. Check back the A-chord and note the common 3-notes grouped together, except that the finger assignments were changed because index finger is used to bar across the fretboard.


Shortcut to Learning Guitar Chords Part-4

On to the derivation.

CONCEPT 4

Now we combine Concepts 1, 2 and 3. We're doing derivation now using only A or E. Let's start with A.

Look at this:

A -> 2 steps up, you get B
B -> 1 step up. you get C
C -> 2 steps up, you get D
D -> 2 steps up, you get E
E -> 1 step up, you get F
F -> 2 steps up, you get G
G -> 2 Steps up, you get A

Confused? Don't! Here's a summary, let "-" means 1 step up the fretboard:

A--B-C--D--E-F--G--A

The whole point of this is: using A "form", you can derive all chords! You only need to learn A, and you get all other chords. Cool, isn't it? For now, I just need you to remember that (re: use A, move some steps UP the fretboard and you'll get all the chords. Normally, you need to move 2 steps, except B to C and E to F which only need 1 step).

Everything's going to get cool from this point on.

CONCEPT 5

Use E form, and you'll also be able to get all chords. Yeah?

Yes. No kidding.

Follow the same progression as in A, 2 steps each except B-to-C and E-to-F. That means:

E-F--G--A--B-C--D--E

You should have realized how simple it is now.

My simplest hint to remembering all of these is using the following diagram:

A-BC-D-EF-G

Don't forget that after G, you go back to E. Did you noticed the symmetry? Let me help if you haven't noticed the obviousness of it. Take another look at this:


Better yet, this:


Do you see a spectacle? (Our band's bassist suggested otherwise, but I reckon it's a bit lewd so I leave you to figure out.) Imagine that everytime.

Now note:

moving from line-to-circle or circle-to-line means 2 step

moving within the circle is only 1 step

So, A->B is 2 step, F->G is 2 step, B->C is one step. Got it?

That's easy. I know.

Shortcut to Learning Guitar Chords Part-3

CONCEPT 3: CHORD NAMES

You should know how to read chord names so you still can read from the chord charts. This concept is standard, we're talking about terminology used in standard music, not only used here exclusively in my tutorial.

Let's take C chord as example. You can pretty much interpolate to other chords:

C - C major; sometimes symbolized as CM
Cm - C minor
C7 - read as it is, C-seven
C# - C-sharp
Cb - C-flat
Csus - C-sustained

The chord names may be combined, like:

CM7 - C Maj seven; sometimes symbolized as CMaj7
Cm7 - C Minor seven; sometimes symbolized as Cmin7
C#m - C Sharp minor
C#m7 - C Sharp minor seven

Got it? You could sure could think of other combination. I haven't seen anything like minor-sustained though. You'll realize when we finished this tutorial.

Thursday, September 16, 2010

Shortcut to Learning Guitar Chords Part-2

I hate to tell you this, but you'd need to memorize a little bit. Yes, just a little bit. A little bit of simple concepts that will progress as we go along. Please don't cringe, like "cringe in horror". Please accept that remembering something is part of learning. I assure you though that I will not flood you with a technical detail used in formal music education. I'll make it as simple as possible free of technical jargons, except when there's really no choice. I will use my own terminology that may make things clearer. To seasoned musicians there, please don't flame me.

Let's start.

CONCEPT 1

There are 7 basic guitar chords. They are A,B,C,D,E,F,G. ( You may see some write it as C,D,E,F,G,A,B. Why? It has something to do with what musicians call "12 equal temperament" tuning system, and C being the reference "cent". As I promised, I'm not to flood you with technical details so let me stop here. You can forget about this, just remember the chords "loops back", see Concept #2. But if you really want to mess your head up, read this entry in the Wikipedia.)

The chords "loop back". What follows after G is A, what precedes A is G. Imagine like ABCDEFGABCDEFGABCDEFG, endless. You can fill your wall with it and you can't change it.


CONCEPT 2

You only need to remember A or E, and you can derive all chords of ABCDEFG. Use A, you can derive BCDEFG; use E, you can derive FGABCD. Hurray!

Here is the A-chord:

And here is the E-chord:


Here's how to do them:

A-chord:

The E-chord:


CONCEPT 3

I expect you to have understood the fretboard now. You have to. And I need you to agree that when I say "move up", it means moving closer to the guitar body; and "move down" means moving closer to the headstock. Clear? UP: move closer to guitar body; DOWN: move closer to headstock. Move what? Finger positions. Just remember what's UP and DOWN means for now.

We also need to agree at what extent you need to move up or down. "1 step" would mean "1-fret".