I was requested for this piece by a reader in Australia, so I tabbed it over the weekends. My reference record (?) is this video in YouTube. Go to flv2mp3.com to get just the audio.
I'm not familiar with this band and this piece, but it actually sound good. I did enjoy playing it. Try the notations here, and watch this post because I am doing the backing tracks and I will post very soon!
Download backing tracks here here. Note that I did some change to the drum beats because I found the original a bit boring :D.
1. Wonderful Land (the Shadows) Full Backing Track - no guitar.mp3
2. Wonderful Land (the Shadows) Backing Track - low volume guitar.mp3
Or directly play here:
1.Complete (with guitar in low volume):
2.Complete (totally no guitar):
Sunday, August 21, 2011
Wednesday, March 16, 2011
Software Tools for Guitarists
Whether you are a beginner or a seasoned guitarist, you'd do well if you know what softwares are out there you can use. I am listing here some of the softwares I have been using, all are free. Some are downloadable, some are online.I will not write about the obvious online resources though, like YouTube where you can find gazillions of tutorials and covers. But you'll find here how to take advantage of those.
I use Linux in my personal computer, but I know majority out there uses Microsoft Windows, so I also noted which operating system a software is available for.
STANDALONE SOFTWARES (Downloadable)
1. Tuxguitar
( Available for: Windows & Linux )
Among it's multitude of uses like tablature editing, and score viewing and creation, I use it mainly to play GuitarPro or PowerTab files, and, Tuxquitar files.
GuitarPro and PowerTab are not free softwares. Tuxguitar is free.
If you are a beginner, you will not appreciate this much. But if you are in to lead guitar, Tuxguitar is an indespensable tool particularly in following the lead parts of songs. Some guitarists suffice in using text tabs, and more advanced guitarists prefer scores (those written in formal music notation). In my case, I only understand a little bit of musical notes so a score is a not a way for me. Text tabs are ok, but it requires me to match each note to the actual song. Just looking at text tabs does not mean a thing, unless you can "hear" the notes in your head. I can't do that.
Tuxguitar enables me to see the notation, and hear notes at the same time. That in turn enables me to easily pinpoint where I am in the song, and to correlate exactly at what note is played in the guitar. It saves me a lot of time figuring out a song. Well, for those who encourage to figure the notes by ear, I can't and I don't have time to learn to do it. Even if I have time, I don't know if I will capable. Plus if other people did the transcription already, I wouldn't bother transcribing it myself and inventing the wheel all over again. I would try though to figure out by ear if I find out that the tab I am using does not sound the way I think it should be. Tuxguitar comes in handy again, because I can edit the tabs, and save it as my own.
3 features I use most often:
Mixer - enables me to mute other instruments and hear just the guitar, or I disable the guitar and I jam along with it.
Tempo Control - enables me to slow down a song and gradually increase to correct tempo.
Composition Open/Close Repeat Function - enables me to master a song section-by-section
Training Mode Function - enables me to continuously increase the tempo from slow to correct tempo (in contrast with #2, Tempo allows you to set to a slower tempo and Tuxguitar will play the whole song with that tempo; Training Mode will continuously increment the tempo everytime it loops.
Tuxguitar will need a long discussion, I will create a separate post for it.
2. Audacity
( Available for: Windows & Linux )
Audacity is another free software. It is used for recording and mixing. I use it primarily to "hear how I sound". I record myself playing, mix with a backing track, and I would hear how I sound.
That is a very important thing. A guitarist should have an open mind to accept comments from listeners, whether constructive or not. At some point, nobody comments on you, or maybe the situation does not afford you a listener to comment. What would you do? Record yourself and listen, and be ready to criticize yourself what you should improve.
With Audacity, I can also convert from MP3 to WAV or vice-versa (there are other audio file formats, but MP3 and WAV formats are convenient enough for me). You will need this feature of Audacity if you are creating your own backing or jam track. You can also cut a section of an MP3 or WAV and save as a separate audio file. This is indespensable if you are figuring out a complicated part of a song. With a cut-paste-save feature, you can focus on a section of a song and you can listen to that part over and over in your stand-alone MP3/WAV player.
Any musician will know that first and foremost, before you can play a piece very good, you must master your piece, like you can play it in your head. You cannot simply do that if you don't know your piece in every nooks and crannies. If you must play a piece very well, you must know how everything sound in every second of it. To be able to do that, you need to listen, listen, and listen more, and remember. Audacity is there to help you.
But at some point part of the song is too fast or complicated, you say. No problem.
Audacity can slow down an MP3/WAV and save it as a new audio file. Combine that with cut-paste-save feature, you have a very powerful tool. What I usually do when I am figuring out a complicated passage is to save 5 different MP3s -- 1st is the original audio at correct tempo, 2nd is 20% slower (re: 80% of original tempo), 3rd is 40% slower etcetera, dump it to my iPod and I can listen to the "dissected" song anywhere. You get my drift? If I transcribe, I may even slow a song down, or a just section of it, to almost unintelligible music. This is an indespensable tool.
3. MIDI Player (MidiNotate)( Available for: Windows only )
If you are a guitarists, you will want to listen to the intruments without the vocals intervening. MIDI is a great way to do so. With MidiNotate you can search the MIDI of the song you want from the internet, and you can play along as the notes are played in your computer.
I used this software back when I used Windows. When I moved to Linux, I sufficed using Tuxguitar, because Tuxguitar can import MIDI files too.
4. Drum Machines
( Available for: Windows & Linux, independent programs )
a. Windows: HammerHead Rhythm Station
b. Linux: Hydrogen Drum Machine
Use this to create drum loops for your jamming. You can also create in Tuxguitar but I find the drum machines faster in finding out the basic beats. Once I figured the drum patterns in a drum machine, that's when I create a complete notation in Tuxguitar for my own reference.
5. Firefox & Video DownloadHelper add-on
( Available for: Windows & Linux )
I know you are not expecting this. It's far too obvious to mention here, but I find Firefox and Video DownloadHelper a great combination. These work seamlessly; and the add-on will not require a separate shortcut on your desktop, just an icon in the Firefox toolbar which is pretty nifty.
If you're a beginner, this pair will help you create a library of tutorials that you can access offline. If you are often interrupted by slow internet connection, you'll love these softwares.
( Available for: Windows only )
You know it. Yes you may have a tuner, but when the tuner battery runs out it's good to have a backup. If you don't want to spend for a tuner, this one's for you.
If your guitar uses a Floyd Rose Bridge, you'll love this tool. In fact, one of my guitars does. It's a headache if you're not used to tuning a Floyd Rose Bridge -- you tighten one string, all others get loose a little bit, and if you loosen one string, all others tighten a little bit. Because in a Floyd Rose Bridge, strings aren't totally independent. The tension of each string has an effect to the tension of other 5 strings. I use software digital tuner to tune it. What I do is open 6 instances of the program, each one is tuned to a string. So even if I tighten or loosen 1 string just a bit, I can immediately see the effect to other strings. If you're using a standalone tuner, in each string you test, you will need for the tuner to reset. Too slow for me.
(Available for: Windows & Linux)
What? Media Player? For video?
Yes. You will run into cases that you can't find a tablature and all that's left is a cover version of a song in YouTube. Download it, and use the slow-down feature of VLC Media Player to watch the finger movements.
I ran into that kind of situation when we are to play the song 214. I cannot locate a descent tab but I found a YouTube cover that sounds really like the original. So I proceed to download the video ( I used Firefox with a download add-on), slowed it down and watch the finger movements, I notated in Tuxguitar, refined, done! It took me a lot less time than transcribing.
If you are a beginner, and you use this tool with Firefox & Video Downloader add-on (see links in #6 below), it will help you a great deal. What you need to do is if you find tutorials in YouTube, download the video and play in VLC Media player, and slow it down as needed. That's short of having a teacher doing a demo to you and can slow down at your request.
ONLINE TOOLS
1. Tablature Sources
These are websites I download tab files for Tuxguitar. You can download GuitarPro files ( .gp3, .gp4, .gp5) or PowerTab files (.ptb), and of course Tuxguitar files ( .tg ). Tuxguitar will import GuitarPro and PowerTab files.
a. GTABS
b. TABSCOUT
c. NUTABS
At some point, you may want only the audio part of a video tutorial you found in YouTube. That's easy, visit this website and it will give you just the audio data of the video ( MP3 or WAV ). If a video resides in your harddrive, you can try "convert by upload".
As the title says, this site converts MIDI to MP3. You will need this if you run into a situation that you will need an MP3 of the intrumental of a song and you cannot find any MP3 or WAV. MIDI is quite easy to find in the internet. But most, like me, don't have a standalone MIDI player, just an MP3 or WAV player ( mine is the phased-out generation 2 iPod mini ). Sure there are lots of MIDI players I can install in my PC (like MidiNotate), but I'd want to listen to the song anywhere I want to, particularly if I am learning a new song; and an instrumental is a great way of figuring out the guitar parts without the vocals intervening. MIDI to MP3 comes in handy in this situation.
5. Online Tuners
Online guitar tuners as last resort if you don't have a tuner or can't use the downloadable Digital Guitar Tuner. You should have a good hearing for these to work. Comparing a strings pitch to a reference by ear takes some training.
Just remember this if you want to try: compare the pitch, not the timbre. Loosen the string you want to tune and compare to the reference. Tighten a little bit (about 1/4 turn of the tuning peg), compare again. Keep tightening and comparing until you hear that your string pitch is a little bit higher than the reference. Loosen a little bit, then this time make your tightening rotation a lot smaller, like 1/8 turn of the tuning pegs. If you end up a little higher again, loosen and repeat the tighten-compare steps. As you get closer to the correct pitch, make your tightening rotation smaller.
--That's about it. I will create separate posts for Tuxguitar and Audacity. You will find these tools really useful, even for bass guitars or keyboards, and to some extent for drums.


Wednesday, September 22, 2010
Shortcut to Learning Guitar Chords Part-10
CONCEPT 11: SUSTAINED or SUS CHORDS
Asus derivation:
 Asus final:

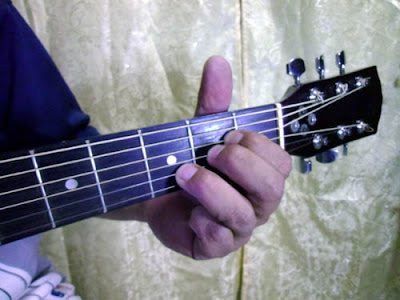
Esus derivation:

E sus final:


For the same reason that you cannot use M7 and 7 at the same time, you also cannot use minor(m) and sus at the same time.
Now, Try this: Bbm7, EbM7, G#M7, Gsus, G#M7sus
This is the end of my tutorial. If at this moment you are still confused, go back and follow each part slowly. Even if you need to read all over again for the 3rd or 4th time, do it. It will be all worthwhile than memorizing the chords individually.
You should be able to derive at least a hundred chords once you understand all concepts. Enough chords for a weekend jam! Cheers!
To get sus chords, move the lowest finger UP 1-step.
Asus derivation:
 Asus final:


Esus derivation:

E sus final:


For the same reason that you cannot use M7 and 7 at the same time, you also cannot use minor(m) and sus at the same time.
Now, Try this: Bbm7, EbM7, G#M7, Gsus, G#M7sus
This is the end of my tutorial. If at this moment you are still confused, go back and follow each part slowly. Even if you need to read all over again for the 3rd or 4th time, do it. It will be all worthwhile than memorizing the chords individually.
You should be able to derive at least a hundred chords once you understand all concepts. Enough chords for a weekend jam! Cheers!
Shortcut to Learning Guitar Chords Part-9
CONCEPT 10: MAJOR 7th CHORDS
Let's dive in quickly. Deriving AM7 from A:
 Final AM7 :

To get Major 7th or M7 Chord, move the Middle Finger down 1-step.
Let's dive in quickly. Deriving AM7 from A:
 Final AM7 :

Take a look at he A-chord again...
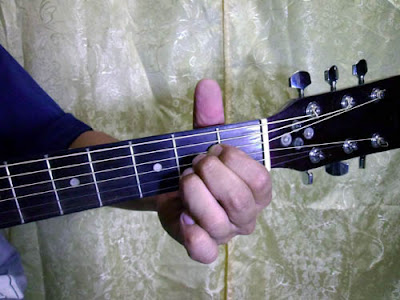
AM7 looks like this (note: the fingers are rearranged like in Am) :

Deriving EM7 from E...
 EM7 is:

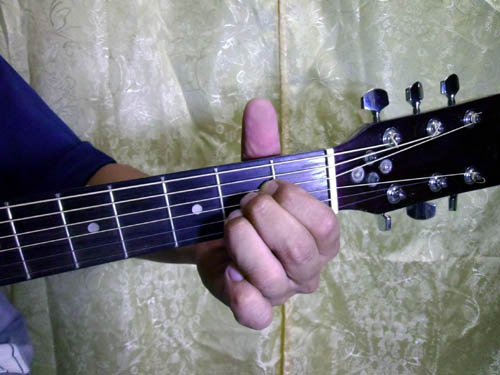
AM7 looks like this (note: the fingers are rearranged like in Am) :

Deriving EM7 from E...
 EM7 is:

In actual: E-chord (you should know it now!) and EM7 are:
E:

EM7:

Note that M7 and 7 cannot be combined because they use the same finger movement just that the extent of movements are different.
To recap: M7 and 7 use middle finger. M7 move middle finger down 1-step. 7 move middle finger down 2-steps.
Try these: A#M7, GM7

EM7:

Note that M7 and 7 cannot be combined because they use the same finger movement just that the extent of movements are different.
To recap: M7 and 7 use middle finger. M7 move middle finger down 1-step. 7 move middle finger down 2-steps.
Try these: A#M7, GM7
Shortcut to Learning Guitar Chords Part-8
CONCEPT 9: 7th CHORDS
I don't expect you to have many writings on your wall, but you could (or should?) write and remember this again:
Let's try A7, we will derive from A-chord, of course.

The finger hit the nut? Leave it an open string! A7 is:


If this is A (it really is),

then A7 is:

E7 should be simple. Starting from E:

Final E7:

I don't expect you to have many writings on your wall, but you could (or should?) write and remember this again:
To get a 7th Chord, move the Middle Finger down 2-steps .
Let's try A7, we will derive from A-chord, of course.

The finger hit the nut? Leave it an open string! A7 is:

If this is A (it really is),

then A7 is:

E7 should be simple. Starting from E:

Final E7:

In pictures, E-chord and E7 respectively:


At this point, pause and ponder. How many chords you can derive now? See how many of the listed chords you can figure out. HINT: Proceed one step at a time. Say A#m7: start from A, derive A#; from the A# position: derive minor(m) to get A#m; from A#m position: derive 7th to get A#m7.
A,Am,A7,Am7
B,Bm,B7,Bm7
C,Cm,C7,Cm7
D,Dm,D7,Dm7
E,Em,E7,Em7
F,Fm,F7,Fm7
G,Gm,G7,Gm7
A#,A#m,A#7,A#m7 / Bb,Bbm,Bb7,Bbm7
C#,C#m,C#7,C#m7 / Db,Dbm,Db7,Dbm7
D#,D#m,D#7,D#m7 / Eb,Ebm,Eb7,Ebm7
F#,F#m,F#7,F#m7 / Gb,Gbm,Gb7,Gbm7
G#,G#m,G#7,G#m7 / Ab,Abm,Ab7,Abm7


At this point, pause and ponder. How many chords you can derive now? See how many of the listed chords you can figure out. HINT: Proceed one step at a time. Say A#m7: start from A, derive A#; from the A# position: derive minor(m) to get A#m; from A#m position: derive 7th to get A#m7.
A,Am,A7,Am7
B,Bm,B7,Bm7
C,Cm,C7,Cm7
D,Dm,D7,Dm7
E,Em,E7,Em7
F,Fm,F7,Fm7
G,Gm,G7,Gm7
A#,A#m,A#7,A#m7 / Bb,Bbm,Bb7,Bbm7
C#,C#m,C#7,C#m7 / Db,Dbm,Db7,Dbm7
D#,D#m,D#7,D#m7 / Eb,Ebm,Eb7,Ebm7
F#,F#m,F#7,F#m7 / Gb,Gbm,Gb7,Gbm7
G#,G#m,G#7,G#m7 / Ab,Abm,Ab7,Abm7
Shortcut to Learning Guitar Chords Part-7
CONCEPT 8: MINOR CHORDS
In previous posts, I have been talking about moving the whole chord position up or down. Meaning, all finger positions move up, or down, simultaneously, same step-count.
This time, we need to move some fingers up or down without moving the chord's position in the fretboard. We will use this method for minor (m), seventh (7), major seventh (M7) and sus derivations.
New term: middle finger, lowest finger. These are the literal finger position in the fretboard as you fret a chord, excluding the barre finger. Lowest finger, is the finger closest to the ground, middle finger is the next finger closer to the ground.
Let's look at A-chord again.

Clear? Now write this on your wall:
To get a minor, move the lowest finger down 1-step.
Deriving A-minor ,or simply Am, from A:
 Finally, Am is:

I figure some pictures will illustrate clearer. The A-chord is:

And Am, note how the fingers are rearranged.

Let's try Em...from E of course!
 If a note hits the nut, you don't have to press anything-- leave it as open string. So Em is:

 If a note hits the nut, you don't have to press anything-- leave it as open string. So Em is:

Let's do it... E-chord:

Em. Yes, lift the index finger and that's it! Easy?

You should be smiling now. Try these: Bm, Gm, Fm
Review Part-6, and try these: A#m, C#m, Abm
Now you could derive 12x4 or 48 chords! Believe me, once you get used to the derivations, it's a lot easier and intuitive than memorizing all 48 chords individually.

Em. Yes, lift the index finger and that's it! Easy?

You should be smiling now. Try these: Bm, Gm, Fm
Review Part-6, and try these: A#m, C#m, Abm
Now you could derive 12x4 or 48 chords! Believe me, once you get used to the derivations, it's a lot easier and intuitive than memorizing all 48 chords individually.
Shortcut to Learning Guitar Chords Part-6
CONCEPT 7: Sharps and Flats
The Sharp and Flat Chords are the chords that are positioned in between the 2-steps you move up or down the fretboard in deriving chords.
To illustrate clearer, let's take A-to-B derivation. Let me remind that B is 2 steps up from A. See Part-5 if you're getting lost. If you move A 1-step up, you'll have A#. Technically, A# is the same as Bb. Now study the diagram below.


You should be able to name the chords now in each step up or down your fretboard. If we use an A-chord to derive other chords and we move 1-step at a time up the fretboard, we'd have:
The Sharp and Flat Chords are the chords that are positioned in between the 2-steps you move up or down the fretboard in deriving chords.
Sharp is symbolized as #, and Flat is symbolized as b. Sharp means 1-step higher, and Flat means 1-step lower. In formal guitar terminology, Sharp means 1-semitone higher, and Flat means 1-semitone lower ( higher & lower refers to pitch). Ooops, no technical jargons. Ok, in my tutorial, we only use "step", which also means "1-fret". So:
SHARP = # = 1-step UP
FLAT = b = 1-step DOWN
To illustrate clearer, let's take A-to-B derivation. Let me remind that B is 2 steps up from A. See Part-5 if you're getting lost. If you move A 1-step up, you'll have A#. Technically, A# is the same as Bb. Now study the diagram below.

Look at these three chords shown. The first one is B-chord...


Moving 1-step down, we'll get Bb (or B-flat)...

and, moving 1-step up, we'll get B# (or B-sharp); or C-chord as you'll find out after you read some more below.

and, moving 1-step up, we'll get B# (or B-sharp); or C-chord as you'll find out after you read some more below.

You should be able to name the chords now in each step up or down your fretboard. If we use an A-chord to derive other chords and we move 1-step at a time up the fretboard, we'd have:
A-A#/Bb-B-C-C#/Db-D#/Eb-E-F-F#/Gb-G-G#/Ab-A
C# = Db
D# = Eb
G# = Ab
Also, using the E-chord and moving 1-step at a time up the fretboard, we'd have:
Note the following:
A# = Bb
C# = Db
D# = Eb
G# = Ab
Also, using the E-chord and moving 1-step at a time up the fretboard, we'd have:
E-F-F#/Gb-G-G#/Ab-A-A#/Bb-B-C-C#/Db-D#/Eb-E
Note that there's no B# or E#, because these are C and F respectively. Likewise, there's no Cb and Fb.
And if you have noticed, you can derive 12 chords by now!
And if you have noticed, you can derive 12 chords by now!
Subscribe to:
Posts (Atom)